Cloud server as a VPN gateway
Table of Contents
- Installation and configuration of OpenVPN tunnel
- OpenVPN tunnel configuration on client side
- Run the sshd service only on the OpenVPN tunnel interface (optional)
Thanks to the OpenVPN tunnel, it will be possible to establish secure, encrypted connections between your local device and the e24cloud server - with the VPN tunnel, it will be possible to use your server as an outgoing internet gateway.
Local computer -> VPN -> e24cloud server -> Internet
The following actions should be performed from the administrative account of the machine. You will also need the PuTTy program.
Installation and configuration of OpenVPN tunnel
First, update the APT package index. After updating, proceed with installing the OpenVPN package.
apt update
apt install -y openvpn
Next, copy the necessary files that will be used to generate keys and certificates and import the so-called environment variables.
cp -r /usr/share/doc/openvpn/examples/easy-rsa/2.0/ ./easy-rsa
cd easy-rsa/
. vars
Set the key length, which can take values of 1024, 2048, 4096 bits. Generally, the longer the key, the higher the level of security at the cost of lower performance.
export KEY_SIZE="2048"
Set the key validity period (in days) - after the keys expire, new ones will need to be generated.
export KEY_EXPIRE="1000"
export CA_EXPIRE="1000"
Set the values for the remaining attributes.
export KEY_CITY="MyCity"
export KEY_COUNTRY="PL"
export KEY_ORG="MyCompany"
export KEY_OU="DivisionName"
export KEY_EMAIL="mymail@my.domain.eu"
export KEY_CN="tunel-vpn-ca"
export KEY_PROVINCE="ProvinceName"
export KEY_NAME="tunel-vpn-ca-key"
Create a so-called CA (Certificate Authority) key and generate a Diffie-Hellman key:
./clean-all
./build-ca
./build-dh
Next, approve or change the proposed values for the given attributes.
Now we proceed to generate the server key. This stage involves creating a server key and then a client key.
export KEY_CN="tunel-vpn-server"
export KEY_NAME="tunel-vpn-server-key"
./build-key-server tunel-vpn-server
During the key generation process, we will be asked to provide a password - challenge password.
We can leave this field blank by pressing the Enter button, as we will do for the next attribute.
Next, we will be asked whether to sign the new certificate - naturally, we answer Y and confirm the operation.
In the next step, we generate a key for the client, i.e., for our local computer, from which we will connect to the e24cloud server.
export KEY_CN=”tunel-vpn-client1”
export KEY_NAME="tunel-vpn-client1-key"
./build-key tunel-vpn-client1
All the necessary keys for the server have now been generated, but we can achieve even higher security.
We will create an additional key for the tls-auth mechanism, which is mainly responsible for rejecting connections from unauthorized clients at an early stage.
Thanks to this, we will also get additional protection against buffer overflow vulnerabilities that occur in the implementation of the SSL/TLS protocol.
openvpn --genkey --secret ta.key
mv ta.key keys/
In the next, copy the generated keys for the OpenVPN service to the appropriate location:
cp keys/ca.crt /etc/openvpn/
cp keys/tunel-vpn-server.crt /etc/openvpn/
cp keys/tunel-vpn-server.key /etc/openvpn/
cp keys/dh2048.pem /etc/openvpn/dh.pem
cp keys/ta.key /etc/openvpn/
Then we create the server file configuration. An example openvpn.conf file can look like the one below.
port 1194
proto udp
dev tun
ca ca.crt
cert tunel-vpn-server.crt
key tunel-vpn-server.key
dh dh.pem
server 10.66.0.0 255.255.255.0
keepalive 10 120
tls-auth ta.key 0
comp-lzo
user nobody
cipher AES-256-CBC
group nogroup
persist-key
persist-tun
log-append openvpn.log
verb 3
mute 10
The configuration file should be located in the directory /etc/openvpn/.
To create the file from the machine’s console, we can use a text editor such as nano, mcedit.
We start the address translation mechanism to make the e24cloud server work as an internet gateway for clients connected via VPN.
sed -i "/exit 0/d" /etc/rc.local
echo "/sbin/iptables -t nat -A POSTROUTING -o eth0 -j MASQUERADE" >> /etc/rc.local
echo "exit 0" >> /etc/rc.local
/etc/rc.local
echo "net.ipv4.conf.all.forwarding = 1" >> /etc/sysctl.conf
sysctl -p
Finally, we start the VPN service.
/etc/init.d/openvpn start
OpenVPN tunnel configuration on the client side
On our server, we have previously created all the necessary keys and certificates for VPN connections. Now it’s time to transfer those required on the client side and create the necessary configuration.
For Linux system on the local computer
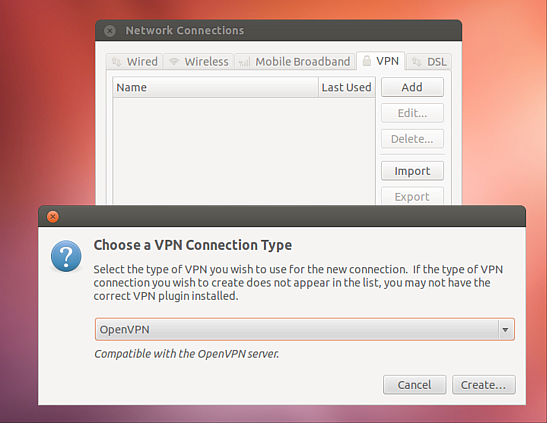
From the local computer, we log in to our server using the sftp tool and download the ca.crt, ta.key, tunnel-vpn-client1.crt, tunnel-vpn-client1.key keys to the local computer’s disk, and then use the NetworkManager applet to create a new VPN connection.

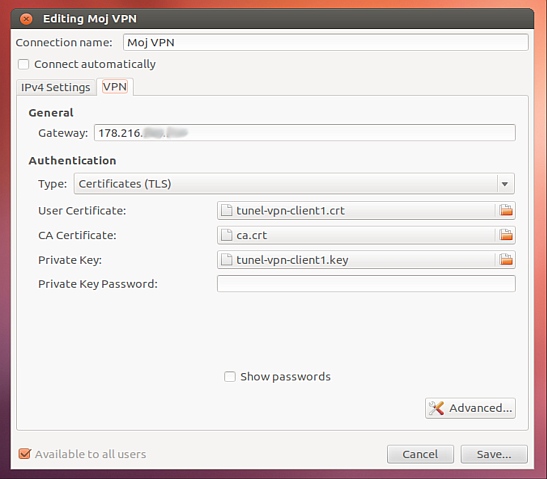
We enter the VPN connection name and the e24cloud server’s IP address. Then we assign the downloaded keys and certificates to the appropriate places and click the Advanced button.

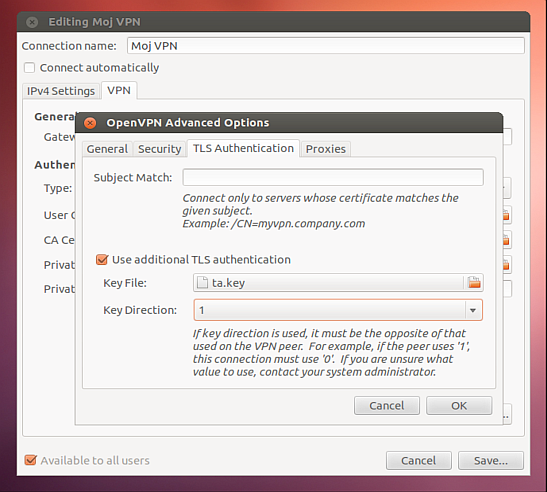
In the new Advanced Options window, we check the box for Use LZO data compression. Continuing, we click the Security tab and choose AES-256-CBC from the drop-down list next to Cipher. We then move on to the TLS Authentication tab, where we check the box next to Use additional TLS Authorization and choose our secret ta.key file. We set the Key Direction to 1. We confirm the changes by clicking OK, and from now on, we can proceed with the connection.

After establishing the VPN connection, the e24cloud server’s IP address inside the secure tunnel will be 10.66.0.1.
For Windows system on the local computer
First, we download OpenVPN for Windows and the WinSCP program and install them.
We start WinSCP. We log in to the e24cloud server by entering its IP address, the username e24, and its administrative password. For File protocol, we select SFTP.

After a successful login, we copy the ca.crt, ta.key, tunnel-vpn-client1.crt, tunnel-vpn-client1.key keys to the local computer’s disk, for example, to C:\Program Files (x86)\OpenVPN\keys\.

We create the configuration file openvpn.ovpn. We provide absolute paths to keys and certificates.
client
dev tun
proto udp
remote 178.216.xx.xx   #adres IP maszyny e24
tls-auth "C:\\Program Files (x86)\\OpenVPN\\klucze\\ta.key" 1
ca "C:\\Program Files (x86)\\OpenVPN\\klucze\\ca.crt"
cert "C:\\Program Files (x86)\\OpenVPN\\klucze\\tunel-vpn-client1.crt"
key "C:\\Program Files (x86)\\OpenVPN\\klucze\\tunel-vpn-client1.key"
persist-tun
persist-key
ns-cert-type server
cipher AES-256-CBC
comp-lzo
verb 3
keepalive 10 120
We save the newly created configuration in the directory C:\Program Files (x86)\OpenVPN\config\.
To establish a connection, we start the OpenVPN GUI application (it may be necessary to run as an administrator), right-click on the OpenVPN icon located on the taskbar next to the system icons, and from the expanded menu, select Connect.

After establishing the VPN connection, the IP address of our e24cloud server inside the secure tunnel will be 10.66.0.1.
Running the sshd service only on the OpenVPN tunnel interface (optional)
To get the SSH service working only on the VPN tunnel interface, we need to modify its configuration accordingly.
We can find the configuration file in /etc/ssh/sshd_config.
echo "ListenAddress 10.66.0.1" >> /etc/ssh/sshd_config
We verify the changes with the netstat command.
netstat -tlpn
As a result, we should find a line containing the IP address 10.66.0.1.
tcp 0 0 10.66.0.1:22 0.0.0.0:* LISTEN 4569/sshd
From now on, connecting to the server via SSH must be done to the IP address 10.66.0.1.